
Six signs your surfski or kayak is not healthy


Surfski and kayak paddling are low maintenance sports but some regular care and attention can be beneficial for the wellbeing and performance of your boat. To help you diagnose and treat these problems you should look for these six signs that your boat may be unhealthy:
Sign 1. UV damage
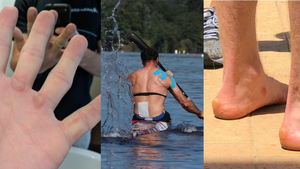
Sign 2. Hairline cracks or soft spots
Sign 3. Wear marks in front of the footplate
Sign 4. Rusting metal fittings
Sign 5. Cracks or holes in your boat
Sign 6. Water inside the hull or a compartment
Sign 1. UV damage

Photo: Used-Kayaks
Diagnosis:
UV light damages both plastic fittings and composite materials. In plastic materials, this shows as a loss of shine, plastic powder when wiped or even crumbling of the fitting. This is common in low-quality rudder housings which haven’t utilised UV stabilised materials.
In composite materials, the delamination of the material can present itself in what looks like a white powder in clear resin, or a white crisp film peeling off the gel coat of a boat. This may be a manufacturer defect or due to too much direct sunlight.
Treatment:
Prevention is always better than a cure so before this happens, seek storage of your surfski or kayak in a covered place out of direct sunlight. A frequent polish with a marine UV protection (for both plastics and composite materials) can be beneficial here as well.
If the sun damage is already present on your kayak or surfski it is recommended to take it to a professional repairer or the manufacturer.
Sign 2. Hairline cracks or soft spots

Photo: Sydney Ski Repairs
Diagnosis:
A number of factors can cause hairline cracks or soft spots, a few being: rough use, bumping into objects in the water or even poor transportation set up (link to another blog). The cracks and soft areas will impact the stiffness of your hull and lower performance. In cases where the individual crack lines are greater than 1mm they may reveal the fibre cloth below the gel coat and will absorb water. This will increase the boat weight and again impact on performance.
Treatment:
You might be lucky and get away with just monitoring the area if:
- The cracks are less than 1mm
- Any cracks do not reveal the composite cloth below the gel coat
- No softness when pressing your hand/fingers against the area
- The area doesn’t stay damp when the rest of the boat is dry
- Gelcoat flaking or cracking more
If the cracks are larger than 1mm large (wider than 1mm) they will most likely require a professional repairer to address it. Our recommendation is to consult the manufacturer or your local repairer who is a fibreglass trade person. These can include yacht builders, surfboard shapers or vehicle panel beaters.
Soft spots can be present in a kayak for some time if they do not absorb water. However, there will be a loss in performance due to a lack of rigidity. If they are large, being greater than 25mm diameter it is our recommendation to have this looked at by a professional repairer.
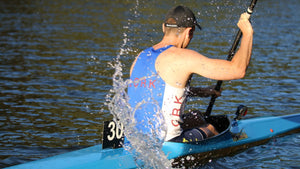
Sign 3. Wear marks in front of the footplate

Photo: Kayaks and Skis Classifieds
Diagnosis:
The most common reason for this is due to your heels wearing through as they rub. In marathon kayaks, it can be the pump tube pinched against the footplate and wearing against the hull. Composite layups are generally made from the layering of a Fibre Cloth (Kevlar/Carbon/Fibreglass), then a Foam Core (for example Nomex honeycomb etc), and finally a Fibre Cloth to sandwich the foam core inside. Holes from heel wear will lead to water being absorbed through the foam core. If you are lucky enough to own a PVC core kayak this will only absorb water in the area where the wear has occurred due to the closed cells rather than soaking through the whole hull like other foam core matting.
Treatment:
Repair any holes and ensure it is smooth for your heels to be on. Reinforce with more layers of fibre cloth or some paddlers even stick down a smooth plastic dinner placemat as a sacrificial layer.
If it is the kayak foot pump, use a file and create a semi-circular bump in the bottom of the footplate so that the pump tubing can fit through easily. This should increase the performance of the pump too.
To reduce this wear happening in the future and to regain the lost performance in your paddling stroke, we also recommend securing your feet more firmly with any of the following combinations:
- Change the angle of your footplate - this can reduce the amount of rubbing and increase the power going through the footplate to move your forwards.
- Double foot strap – one-foot strap attached high, above the tiller bar or at the join of the pedals and another low to keep your heels from moving.
- Pull bar high on your feet and a foot strap low– this is a very common set up for sprint paddlers.
- Heel bar – mainly used by sprint paddlers this keeps your feet locked in and ensures the maximum forces are moving your kayak forwards through the stroke rather than wearing your feet through a hull.
Sign 4. Rusting metal fittings

Photo: Surfski.info
Diagnosis:
The constant use and wetting of your boat combined with the drying when not in use creates an ideal environment for rust or oxidisation of even the best quality aluminium and stainless steels. Oxidisation will lock up your aluminium fittings usually with a white caked powder around metal fittings. Rust, will corrode your stainless-steel fittings until they weaken and break under pressure. Where two different types of metals touch such as an aluminium footplate rail is touching a stainless steel screw will also oxidise.
Treatment:
After each use, use fresh water to wash down your boat and its fittings such as rudder mechanisms, footplates and seats. This will wash away the salts which would corrode metal fittings.
If there are heavily oxidised locked up bolts clean away what you can with a wire brush or old toothbrush. Then to remove the remaining oxidisation which is causing the pedal or screw to be locked utilise products such as WD-40 or marine spray to loosen the fitting.
To reduce the chance of this occurring in the future the marine sprays can be applied to coat the fittings keeping them shiny and easy to use.
Sign 5. Cracks or holes in your boat

Diagnosis:
Do you have that sinking feeling? Large cracks and holes can be obvious when inspecting a boat or noticing the extra water in your hull while paddling. With surfskis or old kayaks pressing your hand along the join seam between the hull and the deck can reveal splits which you may not have seen otherwise.
Treatment:
Regularly inspect your boat for holes or damage to ensure you stay dry and safe. To do this just looking does not always find where damage is present. Pressing a firm hand against the hull and joins will help find the damage and reveal wet spots or cracks where water may enter. To check the rudder turn it to one side and again press your hand on the hull behind the rudder shaft hole to check for soft areas.
No matter the size of the hole in your hull or deck, have your manufacturer or a professional repairer fix these. Tape is not a long-term solution. I do not care what the old guy at your club tells you the age of the tape is on his kayak. Tape is only a temporary fix during training or a race to get you home. Consult a professional repairer for a long term solution.
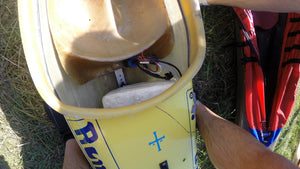
Sign 6. Water inside the hull or a compartment
Diagnosis:
Looking inside of your surfski by the bung hole or inside the cockpit of a kayak you may see dried dirt, mud or even water. You may have a leaking boat and the additional weight will not be great for its performance either. This problem means that you are either not cleaning and drying your boat properly or you have a leaking bung hole, venturi, compartment or hull.
To diagnose most surf lifesaving spec skis or ocean racing surfskis you can do a pressure test yourself by removing the bung hole and sealing your lips over the hole. Then blow into the hull while maintaining the seal with your lips while a friend looks around the hull. This in bad cases can reveal bubbling water or the sound of air escaping through cracks in the hull or at the join seams.
Treatment:
Once you have identified if it is a leaking bung hole/plug, venturi, join seam, crack or all of the above have these professionally repaired. Again, gaffa tape is not a solution…
Anything we missed? Let us know in the comments and we'll add it in to help other paddlers!
- Kieran Babich

Comments 0