
How to install a K1 racing kayak foot pump


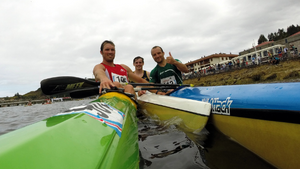
An essential part of any marathon or river race is a kayak foot pump to keep dry and fast while not sinking through the rapids or water from other paddlers splashing into your cockpit. The hubby style foot pump is a very common style which was first invented by the South African paddler Hubby Sandberg in the 1990's.
Included in the Roman Kayaks K1/K2 foot pump pack:
- 2 x Pump Tubes
- 4 x cable ties
- 4 x check valves (2x IN (white) and 2x OUT (black))
- Non-kink piping
- T joiner for the water inlet
- Y joiner for the water outlet
- Instructions in English
- Outlet plug for the deck
- Kayak pump inlet plug
- Mounting brackets
- Screws for mounting brackets

You will also need the following equipment:
- Electric drill
- Masking tape
- Centre punch
- A range of drill bits from 5mm - 12mm
- Not essential but great to use is a Step Drill bit or Hile saw drill bits to fit the 12mm outlet plug and the 30mm pump tubes
- Phillips head drill bit for the electric drill
- Marker pen
Footplate setup:
There are two popular setups of the kayak foot pump. To decide which is best for you, remove your footplate from your kayak and then using the pump tubes and mounting brackets to make a judgment as to which fits your kayak and your feet the best.
Setup 1. Mounting Brackets:
Utilising the mounting brackets across the top or the bottom of the footplate the like the below photo.
Mounting bracket installation time: 30 minutes

Mounting bracket kayak foot pump installation:
- Place the mounting brackets on the top of the footplate where you are seeking to place it and mark out around them. It is a good idea to have the pump tube in the mounting brackets to ensure that they are correctly spaced and when placed back into the kayak can fit in.
- Remove the pump tube and line up a single bracket with your markings. Using the drill and screws drill the bracket onto the footplate.

- Repeat step 2 for the second bracket. Once both bracket pieces are drilled in place check that the pump tube fits. If it doesn't; drill one bracket off and re-mark and drill it into the new position.
- Continue with step 3. Drilling of the outlet in the 'Full-foot setup of the kayak foot pump installation' instructions below.

Setup 2: In-footplate:
Below is an example of the in-footplate method which requires additional drilling of the footplate to fit the pump through.
In-footplate installation time: 45 minutes

In-footplate setup of the kayak foot pump installation:
- Mark 30mm holes in your footplate ensuring that any holes for the pump tubes will not be blocked by any metal supports behind the footplate.

- Then use the centre punch to mark the centre of the 4 pump tube holes and start drilling with 5mm drill bit. Keep drilling increasing the diameter of the piece to 10mm, then continue with the step drill bit or hole saw drill bit to drill out 4 x 30mm holes for the pump tubes to slide into.
- Mounting bracket method continue here. Place a piece of masking tape over where you want the pump outlet to be placed. This should be a place where the paddle will not catch on the deck of the kayak and you can see if the pump is working by the water coming out. With the masking tape in place, use the centre punch to mark the start of the hole, then drill it out to 12mm to fit the pump outlet plug.


- Insert the pump tubes into the mounts or footplate then push the check valves into the pump tubes. Keep the black OUT check valves in the centre and the white IN check valves on the outside.
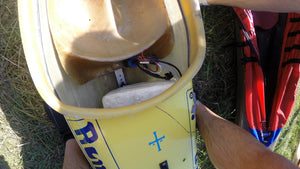
- Cut the piping into 2 x 6cm, 2 x 11cm lengths for connection to the check valves and then 1 x 27cm length. The remainder of the pipe is to be used for the pump inlet. As per below image of the piping at the back of a footplate.

- Attach the 6cm lengths of tube to the black OUT check valves and the other end of the pipe onto the Y joiner piece. The 11cm lengths plugged onto the white IN check valves, then connecting the other end of the pipe onto the T joiner piece. The 27cm pipe piece is to be connected to the remaining Y joiner and the rest of the pipe to the T joiner piece and inlet plug as per the above image.
- Once all tubes are fitted test the footplate for fit inside of the kayak and adjust accordingly. Once it fits nicely without kinking of the pipes cable tie all of the pipes, check valves and joiners so that they are secure.
- Place the pump outlet plug in the deck of the kayak where the drill hole has been made. Then placing the footplate inside the kayak reach behind the footplate and connect the pump outlet plug placed in the deck to the OUT pipe connected to the Y joiner. Then fit the footplate into the kayak as normal.
- Once the footplate is set where you would normally use it test it for fit and comfort making adjustments to your foot strap or pull bar. Then fill the kayak with a few litres of water and sit in the kayak. Depending on the trim of your kayak the water should pool in a place between your seat and the footplate. Cut the inlet pipe so that the inlet plug sits in the water.
- Now you're done, so fill your kayak with some water and test how much you can pump out of your kayak during your next race or training session.
If you've successfully fitted your kayak foot pump using either the video or these instructions let us know in the comments. Or if you have any questions make a comment so we can address it or improve this instruction for other paddlers.
- Kieran Babich
Comments 0