
Portage handles will make you portage like a pro


How to install your own marathon kayak portage handles ready for your next race
The fastest way to portage is to portage cleanly. This requires control of your kayak when taking it out of the water, running with it through the portage, and placing it into the water at the end of the portage. To achieve a clean portage many top athletes upgrade their K1s and K2s with portage handles. These handles remove the risk of your cockpit edge slipping out of your hand or losing control while excess water moves inside of your kayak during the portage. This gives your hand a complete grip to control the kayak and allow you to easily carry the kayak through the portage like a suitcase. The Wash Rider portage handles are also made with an aluminium insert making them stiff to allow you to steer the kayak where you need it when weaving through the pack in a hectic portage.
To install the kayak portage handles to your marathon kayak you can either watch the video below or follow the written instructions below:
What you will need?
- Wash Rider Portage Handles
- Electric hand drill
- 5mm and (or a 3mm) drill bit
- Painters tape
- Marker pen
- Wooden block or metal sheet
- Phillips head drill bit
- Adjustable wrench
Installing the portage handles:
- Find the balance point – to do this you will need to pick up the kayak and hold it so that the kayak is parallel with the ground. Then we recommend moving your hand slightly forward on the cockpit combing. This should raise the front of the kayak up slightly but not have the rear of the kayak on the ground. This will mean that when you come into a kayak marathon portage pick up a K1 full of water, this water will run to the rear of the kayak allowing you to retain control of the kayak while running the portage.
- Using the tape place a small piece to mark the centre of your hand on each side of the kayak. This tape should be even on each side and will align with the centre of the portage handles when they are fitted.
- Mark the centre of each portage handle with tape and then bend the handles into your desired shape:
- Upright bend: using your knee, bend the portage handle into a slight semi-circle shape upwards. This should be enough to fit your fingers under it comfortable when it is fitted.
- Outward bend (optional): using your knee again, bend the previous upright bend of your kayak portage handle in a sideways curve so that both handles will be curved away from the centre of the kayak. This is to allow a lower profile fitting and make it easier to grab.
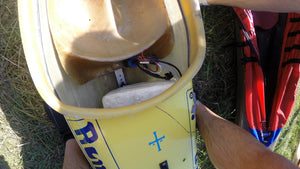
- Choose the placement of the portage handles is recommended in one of two places. This is either on the cockpit combing or under the edge of the combing into the side of the kayak. My personal preference is to drill it into the cockpit combing as it is usually an easier epoxy job if you want to cover up the holes.
Pictured below: portage handles installed on the top of the cockpit combing

Pictured below: portage handles fitted under the cockpit combing into the side of a K1

- Using the flat head pliers, flatten the portage handles ends so that the pre-drilled holes will be flush against the hull or cockpit combing.
- Align the tape marking the centre of the portage handle with the tape marking on the cockpit in your desired position. Then press the marker pen into the pre-drilled holes on either end to mark where to drill. (Note: if installing your portage handles on the side of your kayak hull it is suggested to check inside the kayak that when drilled the position will not go through any cable guides or other important fittings.)
- Starting with a small or 3mm drill bit then widening to the 5mm bit. Drill each hole using the metal sheet or wooden block to protect the side of your boat as the drill bit pushes through. Repeat for all marked holes.
- Place the portage handles into their position screwing the bolt and nut into place with the Philips head screwdriver and an adjustable wrench.
- Use your portage handles in a race, controlling your kayak like a pro, and tag us on Instagram (#washrider) in any photos of you using your Wash Rider Portage Handles.
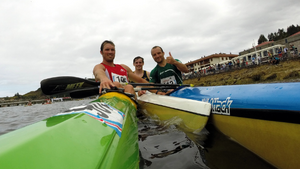
Banner image by Photos by Carolyn Cooper capturing athlete Kate Leverett (McGrath) portaging like a pro at the ICF Canoe Marathon World Championships in Shaoxing, China 2019.
- Kieran Babich
Comments 0